I've always wanted to attempt it and finally, last night, I did. I made a Napoleon! For those of you who don't know, a Napoleon (or a Mille-Feuille in French) is a dessert made of 3 apricot-glazed layers of puff pastry with custard sandwiched between. On top is a white pastry fondant glaze with wavey decorative chocolate stripes. In other words...it's delicious but a bit complicated to make at home. Starting at 7pm and ending at around 10:30pm (only the French would create a dessert that uses puff pastry and then demands that you make sure it does not puff) it was a difficult but fun task. I'm glad I finally tried doing it but I think from now on, I'll buy these tasty treats from the bakery.
Tuesday, March 24, 2009
Sunday, March 22, 2009
Elephant Ears (Palmiers)
Here is a relatively cheap and easy dessert you can make that looks impressive and tastes great. Elephant Ears or as the French call them Palmiers, taste a lot better home-made than store/bakery-bought. You can be daring and try to first make the puff-pastry dough required or for $5 buy some at the store (which is what I did). Below are directions using store-bought puff pastry dough:
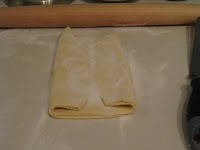
4. Next, fold the bottom half of the sheet of dough up to the middle, then fold the top down, overlapping it (Julia Child astutely notes you should do it just like you would fold a business letter).
(One sheet makes about 14 cookies. Two sheets come in a box normally)
1. If frozen, defrost pastry sheet for 40 minutes
2. Lay down a thick layer of sugar on your counter, enough so that your whole pastry sheet can lay on top.
3. Using a rolling pin, roll the dough with enough force to encrust the bottom of the pastry sheet with sugar.
4. Next, fold the bottom half of the sheet of dough up to the middle, then fold the top down, overlapping it (Julia Child astutely notes you should do it just like you would fold a business letter).
5. Turn the sheet of dough so the top flap is facing your right, and repeat the Business fold again.
6 Roll the dough out now about 8 inches long. Then turn the dough and roll it out 8 inches long the other way to form a rough square.
7. Trim the dough sheet to make it a more perfected square.
8. Fold each side of the square in so that they almost meet in the middle. Sprinkle sugar over the whole thing again and use the rolling pin to encrust the dough with the sugar a bit.
9. Fold the whole thing in half (like you are closing a book) and use the rolling pin again to press down firmly so the layers stay together.
12. Refrigerate for 30 minutes to let the dough set. Preheat the oven to 450. Make sure the rack is in the top middle of the oven.
13. After 30 minutes, bake (one sheet at a time) for 6 minutes or until the sugar on the bottom begins to caramelize.
14. Take out of oven, quickly flip over and lightly cover the top-side of the cookies with sugar.
15. Put back in oven and bake another 3-4 minutes, or until tops of cookies are golden-brown in color and the sugar is caramelizing nicely.
16. Let cool on a wire rack. As the palmiers cool, they will harden and make a nice sweet crunch.
Thursday, March 19, 2009
White House Vegetable Garden!
I say, "Brava!" to the First Lady for her latest project to plant a vegetable garden in the White House lawn. What a good example she is setting for the country!
Check out the NYT article here:
http://www.nytimes.com/2009/03/19/dining/19garden-web.html
Photo credit: whitehouse.gov
Tuesday, March 10, 2009
Julia Child in Paris
For all you Julia Child fans out there...
Bryan and I decided to scope out some of Julia Child's old haunts in Paris.
In her book, "My Life in France" she talks about her flat that she lived in. Located at 81 Rue de L'Université (which Julia shortened to 81 Rue de Loo), Julia and her husband, Paul, lived in the top two floors of the old building. Here is where Julia first began to test recipes for her cookbooks and to learn the French styles and techniques that she would eventually bring to America. It's sad to note that there is no historical plaque on the building and the residents that live there now have never even heard of Julia Child (we asked). While Julia is a huge celebrity in the States, nary a French person outside of the culinary world (that we spoke to, at least) knew of her in Paris.
E. Dehillerin was Julia's favorite kitchen/cooking
supply shop. Located in Les Halles, right by the
famous "Au Pied de Cochon" restaurant, E. Dehillerin's has just about everything a chef would need. It has two floors of kitchen gadgets from a basement filled with copper pots to a wall filled with whisks (or wire whips, as Julia would say!). The prices are all listed in a book that's located in the front of the store. It was great walking around this place, we could see why Julia was in love with it.
Monday, March 9, 2009
Paris
Last time I came back from Paris, I vowed to make my next trip all about the food. Well, Bryan and I just returned from our trip overseas yesterday and I have to say, I kept my promise! Below are some pictures I snapped along our culinary adventure. They are a bit heavy handed on the sweets but that's just my taste buds interfering with good "journalism". Enjoy!
Two baguettes: On the left, a "Traditional" baguette, on the right a "Rustic" baguette. The rustic baguette uses a darker flour and has a deeper and more rich flavor than the Traditional but I think they're both delicious.
The cheese is cheap and comes in a ton of varieties in France. America does not have anything that compares. Most of our imported cheese has already been sitting too long and you don't get the same taste as in a French market but you pay twice the price.
This cheese is called Morbier. There is a thin layer of ash in the middle of the cheese which harks back to a fun story of how the cheese was first made. A French woman would milk her cow first thing in the morning and then use the milk to make the cheese. She would cover the top of the cheese with ash so it wouldn't spoil from the air. In the afternoon, the French milk maid would milk her cow again and place that layer on top of her first layer. It's a cute little story and I was happy they still carried on the tradition. The cheese is a more mellow French cheese and absolutely delicious.
More cheese! This was only 1/5th of the varieties at one local market.
Here a French man lays out his seafood products on a busy sidewalk for people to buy. This is a typical scene in Paris. Fresh food daily.
Okay, so I admit it. I became OBSESSED with pastries. We were staying close to a two famous bakeries in Paris: Pierre Hermes (known for their French Macarons) and Gerard Mulot (a chocolatier but also my favorite pastry and bread-maker).
Cakes from Gerard Mulot
A cake from Gerard Mulot that I actually got to eat!
Gerard Mulot also had some amazing main courses. Take a look at that Coulibiac...the artistry involved in creating that pattern out of pastry...incredible!
Pastry from a random bakery
More random pastry
A window display at Pierre Herme (the Louis Vitton of French Macarons) . These display macarons are much larger than their bite-size counterparts. The traditional bite-size macarons at Pierre Herme cost roughly $2.10 a piece.
The Plenitude: Chocolate & Caramel: Biscuit macaron chocolat, ganache au chocolat-caramel, eclats de chocolat a la fleur de sel
Mogador: Fruit de la Passion & Chocola au Lait: biscuit macaron, ganache au fruit de la passion et chocolat au lait
My personal Favorite. Rose: Biscuit macaron rose, creme aux petales de rose
One last Pierre Herme macaron. The name escapes me but it tasted even better than it looked!
An olive oil chandelier!
The french sell a huge variety of bottled water. The most popular is Vittel. This one was my favorite though. Bling H2O selling for around 36 US dollars a bottle. The "Bling" is written out in Swarovski crystals.
And last, but certainly, not least, I leave you with French CHOCOLATE!
Simple and delicious chocolate and peanut butter cookies!
This past week I found myself a bit bored one afternoon and decided to see what kind of cookies I could make with just what I had in the pantry. It seemed easiest to make a batch of what ended up being absolutely delicious chocolate and peanut butter cookies :-)
The recipe itself is very simple and uses nothing out of the ordinary. The ingredients are as follows:
1 cup all-purpose flour
1/2 tsp baking powder
1/2 tsp salt
8 tbsp unsalted butter (at room temperature)
1/2 cup firmly packed dark brown sugar
1/3 cup granulated sugar
1 tsp pure vanilla extract
1 large egg, lightly beaten
1/2 cup chunky peanut butter, preferably natural
1 ounce 99% unsweetened chocolate, melted
6 ounces 62% semisweet chocolate, chopped into 1/4-inch pieces
In terms of the above ingredients, we did deviate slightly since we wanted to use things we had. Instead of dark brown sugar, we used lite. Instead of 99% unsweetened chocolate, we used a 75% variety. Lastly, we used jumbo bittersweet chips instead of breaking a block into smaller chunks. The cookies still came out delicious, but I'd be interesting in sticking literally to the recipe as well to see if the darker flavors make a difference.
Preheat the oven to 325 and line a 17x12x1 baking sheet with parchment paper.
In a small bowl combine the flour, baking powder, and salt and set aside.
In your kitchen aid (of mixing bowl) combine the butter, brown sugar, and granulated sugar and mix on medium to blend, 1 to 2 minutes. Add the vanilla, egg, and peanut butter and mix for 2 more minutes. Pour in the melted chocolate and mix until just combined. Stop the mixer, then add the dry ingredients, save the bittersweet chocolate pieces.
Remove the bowl from the mixer and fold in the chocolate pieces.
Drop large mounds of dough, about 3 or 4 heaping tbsps each, onto the prepared baking sheet with about 2 inches in between each blob. Bake for about 20 minutes, or until the cookies are lightly cracked on top, rotating the pans halfway through. Remove from the oven and cool on the sheets, then on a cooling rack to cool completely.
Last but not least enjoy!
Subscribe to:
Posts (Atom)