Tuesday, June 16, 2009

Lookout Farm

This weekend, Marco wanted to go strawberry picking for his birthday so we made out way to Natick, MA and stopped off at Lookout Farm owned by the Belkin Family. Established in 1651, Outlook farm is one of the oldest working farms in the country. The farm has apple, peach, pear trees as well as strawberries to pick! For strawberry picking, it'll cost you 8 bucks per person plus $5.99 for a pint or $10.99 for a quart basket. To get to the strawberry fields (forever...ha ha) you have to hop on a "train" and ride for about 5 minutes, you'll get a tour along the way and get to see a lot of fruit trees too.

The strawberry fields are decently sized but not too much to look at at first glance. Once you get off the train and start to actually inspect the plants though, you'll find a ton of ready-to-eat, ripe strawberries that are so juicy they explode in your mouth. Store-bought berries don't compare.

After we went picking, we came home and made the Barefoot Contessa's Strawberry Country Cake which everyone seemed to really enjoy. You can get the recipe here.

Thursday, June 11, 2009

Pita in the South End

I just came across a (new?) restaurant as I was taking a walk in a part of the South End I rarely go to--until now.

I was headed to Zapatos on Albany street (an awesome shop for amazing deals on shoes and various articles of clothing), when I passed this place called simply "Pita." Well, I was both intrigued and excited since I love Mediterranean and Middle Eastern food. So, I walked in and got a menu.

It was, unfortunately completely void of customers at 10:00-ish when I walked in, but the restaurant was nice and clean and seemed fairly new or newly remodeled.

The menu looked great, and the prices were very reasonable. They serve typical breakfast fare from 6am on weekdays, and the lunch and dinner offerings made my mouth water: salads, shawarma, falafel, stuffed grape leaves, baklava, etc.

I can't wait to try them out. (I didn't yesterday since I already had lunch plans.) I'm so glad to have found it, and I plan to become a regular (assuming it's good!).
Does anyone know anything about this restaurant? Know how long has it been there?

~~~~~

Les Gourmands finally made it there. Here's what we thought. 

~~~~~

473 Albany St at Union Park St.
Pita on Urbanspoon

Monday, June 8, 2009

Awesome Easy Cheesy Bread

Jeffrey recently shared his family's summertime cheese bread recipe with us and it's as delicious as it is easy to make! This bread goes great with steak or serve it up at your next brunch! It'll be gone in seconds!

Cheese Bread

2 twin loaves of french bread (or one long one)
1 brick sharp cheddar cheese sliced thinly
1 brick monterey jack cheese sliced thinly
1 softened stick of butter
2 TBSP olive oil
3 TBSP chopped fresh chives
garlic salt to taste.

Make a mixture of soft butter, chives, olive oil and garlic soft. It will be like a soft paste. Slice the bread down every 1 1/2 inches or so - not all the way. Into these slices insert one cheddar and one Monterey Jack cheese slice. Spread the mixture all over the top and sides of the bread.

Wrap in foil completely (Use heavy duty foil and make sure everything is sealed well.). Bake at 375ºF for 20-30 minutes.

Happy Anniversary!

We've been so busy we almost forgot! This past Monday marked the one year anniversary of Les Gourmands du South End. It's been a busy year of eating, baking and cooking! We've thoroughly enjoyed bringing you all of our restaurant reviews and delicious recipes! We've had a blast updating and hope you'll stay with us as we bring in another great year! Bon Appétit!

Peter's Favorite Ice Cream Flavor for Summer 09

For the past two summers, my favorite ice cream has been the cinnamon ice cream from Picco's in the South End.  This year however, we have a new winner!  If you haven't had it yet, you MUST run out and buy it asap.  My favorite new ice cream flavor (for summer 2009) is....(drum roll please):  Mission to Marzipan.  A new Ben & Jerry's flavor this ice cream is a must for anyone who loves Marzipan (and for those who aren't too sure, it's still delicious, I promise!). 

(image courtesy of Benandjerrys.com)

Sunday, May 31, 2009

Red Velvet Cake and Pralines


It seems that I'm in a southern kind of mood.  After a successful attempt at baking a red velvet cake (I used the recipe from the cookbook, Heirloom cooking with the Brass Sisters) I decided to try my hand at pralines from a recipe in a Williams-Sonoma cookbook.  Either I cooked the sugar a bit too long (I wanted to get that nice brown color) or we stirred the mixture too long but my pralines ended up being a hardened mass of pecans.  I was so disappointed but we were still able to salvage the candy coated nuts and will use them as a topping for ice cream or another cake.  If any southerner out there knows of a fantastic praline recipe, send it our way!

Biscotti (Attempt #1)

On my quest to find the perfect biscotti recipe, I came across the following one from our North End Italian Cookbook. I tried it out (my first biscotti attempt ever) and it came out pretty well. To me, they tasted more like anisette toasts (like the ones from Stella D'oro) but they were good nonetheless. The recipe from my book was not very exact. I ended up adding a lot more flour and baking the biscotti a lot longer to dry it out but I made note of that below (in italics). Give them a try and tell me what you think.

Biscotti
(from "The North End Italian Cookbook," adapted by Les Gourmands du South End)

Yield: 2 Dozen Large or 45 Small

Ingredients:

2 cups flour (you will probably need about a cup more)
0.5 teaspoon salt
2 teaspoons baking powder
3 eggs, well beaten
1 cup sugar
1 stick butter, melted
2 teaspoons vanilla extract
1.5 tablespoons anise extract
1 cup nuts (optional) (I used pecans)
0.5 cup dried fruit (e.g, cranberries) - (optional)
0.5 cup miniature chocolate chips (optional)

Method:

1. Preheat oven to 350ºF
2. Sift together flour, baking powder, and salt.
3. Beat together eggs, sugar, melted butter, and flavorings on medium speed.
4. Blend dry mixture into egg mixture on slow speed until smooth and firm. Add more flour if dough is too soft to handle. (You should expect this.)
5. Remove from mixer onto floured board or counter.
6. Gently knead dough, adding more flour as needed.
7. Knead in any of the optional ingredients you choose to incorporate.
8. Cut dough into three parts and place on an ungreased cookie sheet. (I used a Silpat Nonstick Silicone Baking Mat.) Form into three log shapes, each about 6" long; flatten slightly.
9. Bake in hot oven for 25 minutes with cookie sheet in the middle rack. Watch for burning bottoms. (With the silpat, I did not experience any burning.)
10. Cool loaves on rack for 5 minutes. Then, while still warm slice them into half-inch slices, using a serrated knife.
11. Place the slices cut-side-down on a baking sheet. Return to oven and bake at 350º for 10-15 minutes. (I think they will need to bake for at least 40 minutes to dry them out biscotti-style.)
12. Remove from oven once desired doneness is achieved. Let cool (they'll get crunchier as they cool). Enjoy!


If you aren't getting that nice browned crispiness typical of biscotti, I found that, after baking the biscotti in the oven, if you then put them in the toaster oven on bake at 300ºF for 5 minutes, you can get a nice light brown color and crispness to them.


Wednesday, May 27, 2009

The Landing Restaurant & Bar - Newport, RI

Situated right on Bowen's Wharf amidst the hustle and bustle of Newport's waterfront and having outdoor patio dining, 'The Landing' seemed like a perfect spot for a relaxing lunch. Having been there last summer, I recalled a very nice experience with tasty seafood and resultantly threw it out there as a suggestion. A larger party, we were much to our surprise seated immediately on the patio. Unfortunately that would be the only 'immediate' service we would receive throughout the meal.

Despite sitting next to the bar, a number of hangovers prevented anyone from partaking in some local brews or beachy beverages, so after some 10 or 15 minutes we finally managed to get a round of waters. I was in the mood for an appetizer, and given that I was on the shores of Rhode Island I saw it fit to get some stuffed Quahogs - local clams minced with chouriço and breading. For those interested in some etymology, the word 'quahog' comes from the Narragansett 'poquauhock', which is how one of the Native American tribes named the clam species.

For my main dish I chose the steamers which were on daily special and simmered in a local beer whose name escapes me. Though a little on the sandy side, once washed off in the delicious clam water they were excellent. Christina went with the fish and chips which ended up being surprisingly tasty - not at all greasy or too heavily breaded with panco, the cod was nice and flaky. Christopher opted for the seafood salad roll which consisted of bay scallops, shrimp, and crab claw meat "in a blend of dill, lemon, and light mayonnaise". Maybe it was the light mayonnaise, but I personally didn't find this all too flavorful. I think when it comes down to it you just have to shell out the extra couple bucks for the lobster roll. Melanie went with another one of the specials, the grilled striped bass sandwich which she thoroughly enjoyed. Other members of our party ended up with clam chowder and filet of fish sandwiches, though unfortunately I couldn't get any commentary. Most everything looked delicious.

While the food was overall very tasty, I must say the service was atrocious. Half an hour between drink refills on a warm summer day, lack of silverware, and a forgotten lunch order were but a few of our issues. Fortunately this very much contrasted with my previous experience here, so I would definitely give it another go, perhaps staying later into the night for some time at the bar with live music.

Landing Restaurant on Urbanspoon

Tuesday, May 26, 2009

Spain of Narragansett

Nearly every time I've gone to Chris' parents house in Narragansett, he has mentioned 'Spain' as being a great option for a nicer meal. Being a lover of all things Spain, I was quite delighted when the whole lot of us decided to dine there one evening over Memorial weekend.

The restaurant itself is quite large and seems accustomed to hosting large parties of vacationers or a variety of celebratory occasions. The lighting has an overall dim yellow glow to it, and pictures from all over Spain line the walls. The first floor has a main dining room and sizable bar, while the second level is dining only and rather lush thanks to all the hanging green plants. With our party of twelve we were led upstairs after a few minutes of waiting.

Taking my first glance at the menu I found a few things problematic, namely the presence of pasta and some other not-quite-Spanish items. After some further consideration and realization that this place was not in Madrid, I was ok with the stretch of Spanish cuisine. When our bread was presented with herb butter and not olive oil I cringed a bit, but not to turn down some nice butter I quickly became accustomed.

Those of us of age began with two pitchers of sangria, one red, one white. While tasty, the red was a bit too juicy for my tastes and could have used a bit more spice, not to mention a bit of a kick via brandy or another liqueur. This, however, did not stop me from several glasses. I unfortunately did not taste the white, but it looked nice and refreshing. Skipping appetizers, everyone figured out their meal choices and were ready to order. I had a taste for veal and went with the veal "Jerez", served in a sherry (Jerez) sauce and sauteed with asparagus, spinach, "imported prosciutto", and provolone. It was a sizable portion and I quickly devoured every bite with gusto. The veal was very tender, and who doesn't love anything smothered in cheese and prosciutto? The vegetables were nice, as were the surprise mashed potatoes. How Spanish, I know.

Derek apparently also had a taste for veal, opting for the "Madrid" option.
This was prepared in a light egg batter sautéed in white wine and citrus sauce and was accompanied with rice and some vegetables. This was gone in no time, so it must have been delicious.

Christopher went with the paella marinara, a variety of shellfish baked into saffron rice. This included scallops, shrimp, mussels, and much to my delight half a lobster! The seafood itself was very nice, though I thought the rice could have used a bit more flavor to it.


Bessie chose the "Pasta de Vigo", named after the Galician city. This consisted of shrimp sautéed with romano and sun dried tomatoes, fresh basil, Absolut Vodka, and garlic & herbs all served over the chef's pasta, which appeared to be linguini. A simple dish, there is not much that could have gone wrong with it, and the sun dried tomatoes added a nice bit of extra flavor. Meanwhile Tara went with one of the daily specials, the lobster ravioli. From what I recall the dish consisted of eight ravioli with a smattering of shrimp served on top. The ravioli were very much enjoyed, and Tara attested to legitimate chunks of lobster inside each pasta. She did, however, say that the accompanying sauce with Absolut vodka was much thinner than what she is used to having with ravioli of that sort.
At the end of the meal everyone was satisfied and certainly no one had room for dessert. If you are ever in Narragansett and looking for a satisfying meal with a hint of ethnic "flair", I wouldn't hesitate to mention Spain...just don't come expecting to be transported onto the Iberian peninsula.

Spain of Narragansett on Urbanspoon

Monday, May 25, 2009

Last call for Aujourd'hui - from Boston.com

So sad!  One of our favorite restaurants, Aujourd'hui, is closing its doors. Go now for an EXCEPTIONAL meal before it's too late!

Last call for Aujourd'hui - The Names Blog - Boston.com

Posted using ShareThis

Sunday, May 24, 2009

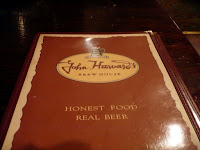
John Harvard's Brew House

Yesterday, Bryan and I took his parents to Harvard Square for some site seeing and shopping. It was a beautiful day and we worked up an appetite pretty quickly. Putzing around the streets, we happened upon John Harvard's Brew House and decided to try it out. I've been in Boston for almost ten years now and after our experience at John Harvard's, I am so annoyed at myself that I didn't go there sooner. John Harvard's serves traditional pub food along with a changing seasonal menu. John Harvard's beers are brewed naturally and are all unfiltered. I'm not sure if they are brewed on the premise or not but there is some brew equipment in the house, whether it's functional or not is another story.

We started our meal off with a seasonal beer that just screamed Boston/Cambridge. The Charles River 10 is a Belgian Saison beer that was: brewed with 10 provincial botanicals from the Charles River Watershed to celebrate the 10th anniversary of the Charles River Watershed Association's annual cleanup of the Charles River. The botanicals lend notes of Juniper and Rose Hips to the aroma and a sweet floral finish to this golden ale. The beer was fantastic. It was light and a bit sweet/floral tasting and definitely worth ordering. I only wish they served it year-round!

The meal started off with complimentary focaccia bread baked right on the premise with a pesto infused olive oil. The bread was light and so flavorful and just fantastic with the olive oil. We all agreed that it was some of the best focaccia bread we've ever had.

For our entrees: Bryan ordered the daily half-sandwich combo which consisted of half of a roast beef sandwich and salad or soup or fries. Bryan said it was good but I don't think it was anything totally incredible (not sure how much you can you do with a roast beef sandwich....).

I ordered a seasonal sandwich which had grilled chicken breast, Fuji apples, lettuce, onions, an infused mayonnaise sauce, and blue cheese on a homemade multi-grain bread. I think it was the best sandwich I have had in Boston. Much better than anything I've ever gotten at Parrish Cafe and the bread (again, homemade) was amazing. Another seasonal specialty I wished they served year round.

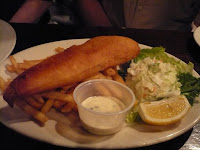
Russell got the fish and chips which came out as one big fish piece. Russell said it was delicious, the fish was nice and tender but was better with the malt vinegar than with the tarter sauce. Ellen got the curry chicken wrap which was a chicken curry salad with grapes. Another special of the day, Ellen thought it was great and would order it again.

The breads we had at John Harvard's seemed to really stick out in our minds as being of excellent quality and some of the brightest stars of our meal. The food, although simple sounding was extremely satisfying, had great flavor, and was of good value (most sandwiches were around $8). If you're in the area, swing by John Harvard's for lunch and a beer. I don't think you'll be disappointed.


John Harvard's Brew House on Urbanspoon

Saturday, May 23, 2009

Chilaquiles!

Are you tired of always having Bacon and Eggs for breakfast? Here is the recipe for you.

While on a recent trip to California, we were lucky enough to have home-made chilaquiles prepared for us for Sunday breakfast.


I adore chilaquiles, and was so excited. I've never made them for myself, so I asked Diana to teach me. It's really quite simple, and the final product will leave you wanting more.

Now, we didn't go by any set recipe with measurements, etc., since, as Diana explained to me, some people like their chilaquiles with varying degrees of sauciness. We did them to taste.


We started with some salsa verde (from the looks of it, it was about 2-3 cups of salsa for 4-5 people). You can also use red salsa, but we were all in agreement that we prefer ours green. (But, of course, the red ones are equally scrumptious.)

Diana used one of her favorite salsas verdes from the grocery store but said making it yourself is also very easy if you have the wherewithal to do so (but that recipe is for another time).

So, where were we? Salsa. Right.

Heat-up your sauce in a heavy pan. Diana let it simmer for a few minutes. In the meantime, she opened a bag of very good tortilla chips. (We talked about how to make your own, but, again, that is for another time.) The tortilla chips she used were amazing. If you can find some good quality authentic chips, use them, but otherwise, any tortilla chips will work. (I used Tostitos this morning in my trial batch, and they were delicious.)


Add your tortilla chips to the sauce and stir well, ensuring all chips are covered by the sauce. (Again, I have no exact measurements, but for 14 oz. of salsa, I used about 1/3 of a family-size bag of chips.)

Once your chips are sufficiently covered, sprinkle with crumbled cotija or shredded queso fresco or monterey jack. Let the cheese melt, and your chilaquiles are done! How easy is that?!


Serve them hot by themselves or topped with fried egg or some pulled chicken. Diana and Frank love theirs topped with crumbled chorizo.


This delicious, easy, and versatile dish will quickly become one of your favorites; I can almost guarantee it.

¡Buen provecho!

Wednesday, May 20, 2009

Mohegan Cafe & Brewery - Block Island, RI

After an adventure-filled day of biking around Block Island our appetites were in full force and ready for something hearty and delicious for a late lunch. A stone's throw from the Old Harbor Ferry dock is Mohegan Cafe & Brewery, a cozy pub-type joint that seemed to us very inviting. The restaurant is divided into two parts - a sizable bar area and a dining room, all of which is decorated with kitschy nautical decorations and some great photos of the Island from the past hundred or so years.

I absolutely love places that brew their own beer, and for such a small place it had a great selection of home brews including a light Pilsner, a refreshing Wheat beer, and even a Chili Pepper Ale. Since I knew I was ordering something with a little kick to it I just had to try the Chili Pepper Ale. It was surprisingly light and refreshing, but with a great chili after-taste - imagine the taste of a chili pepper without the heat. Chris opted for 'Joe's High Octane Brew', named for its apparently higher alcohol content, but also very tasty. While several reviews I have read highlighted "poor quality" brews from Mohegan Cafe, for my, I suppose, unsophisticated beer palate I thought the stuff was great.


There was an interesting-sounding cod and corn chowder that I ordered as my starter, but unfortunately the waitress misheard me and brought out their New England Clam chowder. Luckily this was delicious - very rich and creamy with nice chunks of clams like it should have. Our waitress was otherwise great so I didn't bother making a fuss about the mix-up.

For lunch there were a nice number of options - all kinds of sandwiches, burgers, salads, and seafood items. The Cuban Pork Sandwich with spicy Cuban fries caught my eye, as did the Chipotle chicken salad for Chris. My bread was nice and crispy, the pork very flavorful, and the spices and pickles complemented each other very nicely. The fries were delicious as well. Chris loved his chicken salad, but I thought it could have used a bit more overall flavor. The mayonnaise they used was a little on the bland side, though the Chipotle flavor definitely came through in the little bite of an aftertaste.

All in all I had a very nice experience and really enjoyed the laid-back, cozy atmosphere. I look forward to returning and trying some of their other home brews!


Mohegan Cafe on Urbanspoon

Sunday, May 17, 2009

Peter's Easy Molten Chocolate Dessert

This is a super easy recipe that makes for an awesome finish to any dinner party. The whole recipe takes about 25 minutes (including prep and baking time). Make the moltens right before you want to eat them because you'll want to serve them straight out of the oven. The top will be a nice chocolate crust but when you dive, a rich mouth-watering pool of gooey chocolate will emerge.

Ingredients
1 stick butter
1 1.5oz Hershey bar
2oz 100% cacao unsweetened chocolate (Ghirardelli is much preferred)
1 handful semisweet chocolate chips
2 eggs
1 cup sugar
3 tablespoons all-purpose flour
4 (2/3 to 1-cup capacity) ramekins

Directions
Put a baking sheet in the oven on the middle rack and Preheat the oven to 400 degrees F.

Butter the inside of ramekins or spray with butter Pam spray.

In a double boiler, melt all the stick of butter and all the chocolate together. Once melted, set aside and let cool for a few minutes.

In another bowl, whisk together the eggs, flour, and sugar. Beat in the chocolate/butter mixture.

Divide the batter evenly into the four ramekins.

Bake for about 20 minutes. The tops should look cooked but underneath will still be gooey.

Let your guests eat the dessert right out of the individual ramekins. Just make sure you warn them that the ramekins are still hot.

Easy, and trust me, absolutely delicious.

Friday, May 15, 2009

Sweet

I have to admit, I love this new "gourmet" cupcake fad that's recently made it's way to Boston. The idea just really appeals to me; it's a mixture of nostalgia and delicious goodness that only a cupcake can bring. So imagine my delight when this past weekend, our friend Adam said he wanted to try out cupcakes from the bakery "Sweet" in the Back Bay. I called up the day before (the website recommends this) to make sure I could get all the flavors Adam had wanted. I ended up ordering a dozen since the woman on the phone told me that, presently, the bakery was offering a dozen different flavors (minus the vegan cupcake, offered only on Mondays).

We picked up the box and the presentation was very nice. Unfortunately though, the mix of cupcakes inside was not exactly what I had asked for. There were no seasonal cupcake flavors (some of the seasonal ones sounded the best) and only the "Daily Sweet" flavors were given to us. There's only about 6 different daily flavors so we got some repeats. We were a bit disappointed but decided it gave us an excuse to go back if we enjoyed these.

As for the cupcakes themselves: The cupcakes are relatively small with a huge dollop of icing on them. They are pretty simple looking but pretty cute nonetheless. Most of our tasters said that they would like more cake and a bit less icing. The cake for most of the flavors was dense, almost like a wedding cake recipe and tasted fine (nothing special though). Almost everyone's favorite was the "Organic Karat". The cake was more moist and light and the icing, a cream cheese based icing, was lighter as well. Since I don't care too much for cream cheese icing, my favorite was the dark chocolate cupcake (the icing tasted the best to me). Most of the other cupcakes were nothing to write home about and all tasted relatively the same. We decided that for $3 a cupcake, Sweet just wasn't worth it. Many of us preferred the cupcakes from the South End Buttery instead. In all fairness, I think Sweet offers cupcakes that are decorated fancifully which might be more fun at a birthday party but taste wise, there was nothing gourmet about these cakes.

Sweet is located at 49 Mass Ave in between Marlborough and Comm. Ave. Sweet offers the following daily flavors:

THE DAILY SWEET
READY-TO-EAT

THE SWEET CAKE*
Creamy Madagascar vanilla bean cake
with buttercream frosting in vanilla or chocolate
DARK CHOCOLATE*
Rich chocolate cake baked with Dutch cocoa
topped with buttercream frosting in vanilla or chocolate

ORGANIC KARAT*
Moist carrot cake with shredded organic carrots and crushed pineapple
topped with classic cream cheese frosting and an edible gold leaf petal

CAPPUCCINO*
Delectable espresso flavored cake bakedwith Callebaut chocolate crowned with signature Sweet frosting
and a dusting of cinnamon

RED VELVET*
Gentle hint of Bensdorp Dutch cocoa, a classic shocking red hue
and Sweet's delectable cream cheese frosting
BOSTON CREAM PIE
Sweet chiffon cake filled with homemade pastry cream
topped with chocolate ganache and a frosting "cherry"

VEGAN CUPCAKE (MONDAYS ONLY)
Yummy chocolate cake and delectable frosting
that is 100% vegan (dairy and egg free) and cholesterol free


Sweet on Urbanspoon

Monday, April 13, 2009

Pavlova with Lemon Curd and Berries

For Easter this year, I decided to try out a recipe from Gourmet Magazine. We already had a chocolate dessert in the works so I wanted something a bit lighter. I came across a recipe for Pavlova with lemon curd and berries and decided to give it a shot. The original recipe can be found in the April 2009 edition of Gourmet on page 86. I, however, have some tiny changes to the recipe that I want to share with you that I think will produce an even better pavlova. If you don't know what a pavlova is, you're not alone. I was clueless until a friend made it for us awhile back. Basically, a pavlova is a bed of baked meringue that has some sort of custard or sauce on top and then berries on top of that. It's light and sweet and perfect for the summer. Below is my version of the Gourmet Pavlova.


For Meringue:

1 cup granulated sugar
1 Tbsp cornstarch (mix this in with the sugar before you begin)
3 large egg whites room temperature (save the yokes for the filling)
1 tsp white vinegar (I used coconut vinegar, not sure if it made a difference or not)


For Filling:

2/3 cup granulated
1 Tbsp cornstarch
pinch of salt
1/3 cup fresh lemon juice (about 1 1/2 lemons)
1/2 stick unsalted butter
3 large lightly beaten egg yokes
2 tsp grated lemon zest
1 cup heavy cream
4 cups mixed berries (I used strawberries, raspberries, and blackberries)

Making the meringue:

Preheat the oven to 300 degrees. Using a piece of parchment paper, trace the face of a plate or cake platter that you plan to put the pavlova on. A regular dinner plate would make a good size. Beat together the salt and egg whites on medium speed until they form soft peaks. Next add the water and beat until the egg whites hold soft peaks again. Next, on medium-high speed slowly add in the sugar and beat 1 more minute. Lastly, turn to high speed and beat in the vinegar until meringue is glossy and holds stiff peaks (this takes approx. 5 minutes). Once done, spread the meringue out on the parchment paper in the size of the circle you traced, mounding up the sides more than the middle to create a place for the berries to lay. Bake in the oven about 45 minutes. After 45 minutes, turn the oven off and prop the door ajar and let the meringue cool inside for an hour.

Make the lemon curd while the meringue is cooling:

stir together the sugar, cornstarch, and salt in a 2-qt heavy saucepan. Next add the lemon juice and butter. Bring to a simmer and whisk constantly for about a minute. Mix in 1/4 of this mixture with the egg yolks. Take the mixed yolks and pour them into the saucepan. Reduce heat to low and cook, whisking constantly, until curd is thick (about 2 minutes). Don't let curd boil. After 2 minutes transfer the curd to a bowl and mix in the lemon zest. Cover the surface of curd with plastic wrap or parchment paper and let cool in fridge for about an 1 1/2 hours.

Assembly:

Beat the heavy cream until it holds still peaks, then fold it into the lemon curd. Spoon lemon curd into the meringue and mound the berries on top.


You can eat the pavlova right away but from my own experience it tastes better if you refrigerate covered overnight. The meringue becomes more marshmallowy and the flavors have time to blend.

An Indian meal from Sabrina!

The following is from my dear friend, Sabrina, who was my accomplice in so many things in Paris, including many, many meals of delicious Indian food. I was usually in charge of the Saag/Palak Paneer and chai.

She just sent me the following--her first addition to the blog! Have fun!

Welcome to the Sidhu household where the food is normally very healthy, not spicy and relatively easy to make. Not the typical Indian story right...but ours is not the typical Indian household. We have travelled all over India and lived in so many different states that one loses count. We constantly had to move, pack, unpack, and had little time for details. Plus some healthy food was always required since we were subjected to changing cuisines, which were often greasy and spicy. Our stomachs needed an anchor! So food had to be easy, quick and healthy. The Curd Chiken curry is a signature dish from the Sidhu household, one that my mom taught me before I left for Paris. She also taught me Aloo Zeera since I insisted that I needed to know more "easy" dishes if I had to play host and invite people over. So if I could do this, so can you.

Here are some easy recipes and you can thank my mother for them!

Curd Chicken
Chicken 1 kg
Garlic    11/2 pods
Ginger    1 piece
Curd/ Yogurt  1/2 kg; 2i/2 cups
Salt 1 heaped tsp
Pepper , turmeric 1/2 tsp each
Coriander powder 1 tsp
Red chilly powder  1/2 tsp

Mix the chicken with curd ( beat the curd so it is smooth) and add the following: oil or butter; ginger/ garlic (in paste or pieces), ; turmeric; salt; nutmeg; pepper; red chill powder( if you want it spicy)  coriander (powder or whole), cardamon (powder or  whole), cinnamon (powder or whole)

Leave this to marinate for about 4 hours in the fridge or even overnight. The longer you marinate it , the better. Make sure you make small cuts in the chicken pieces so the marinade can soak in. The chicken could be boneless or with bones but should be in small pieces.

Cooking: Heat some oil in a pan, and add the marinade and cook till the chicken is tender and the water has evaporated. Voila! Curd Chicken  is ready :)

Eat the curry with some basmati rice.

If you really want to be fancy, then you can add a third dish : Raita-  Take some curd, beat it and add chopped tomatoes , salt and pepper. The curd normally has a cooling effect if the chicken is spicy.

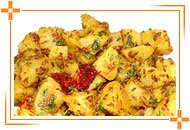
If you want to show off, then you can make Zeera Aloo or Cumin Potato which is also very easy to do. Boil potatoes, peel the skin, and cut into small square pieces. Then in another dish, heat some oil, and add cumin and garlic. Let that cook, and then add onions and cook. Add turmeric and salt and pepper. Then add the potatoes and mix. Garnish with coriander.


You don't need any special ingredients except the turmeric & coriander powder ...which should be readily available at the local grocer. The others (cardamom, cinnamon, nutmeg) should be readily available anywhere. If you cant find coriander powder, you can use fresh coriander.

So now your meal is: CURD CHICKEN; BASMATI RICE; RAITA; ALOO ZEERA


Enjoy cooking! Hope it turns out well :) Send me some photos!

Wednesday, April 8, 2009

The Neiman-Marcus Chocolate Chip Cookie Challenge

Ever heard the story of the Neiman-Marcus cookie? No? Well, the website Snopes.com sums it up like this:

"Neiman-Marcus charged a shopper $250 for its cookie recipe, not the $2.50 the woman had been expecting to pay. As revenge on the store for refusing to reverse the charge, she now provides the recipe for free and exhorts others to pass it along."

Long since proven as an urban legend, the cookie story still gets passed around the internet along with the "infamous" recipe. Neiman Marcus on their website sums it up like this:

"An urban myth is a modern folk tale, its origins unknown, its believability enhanced
simply by the frequency with which it is repeated. Our signature chocolate chip cookie
is the subject of one such myth. If you haven't heard the story, we won't perpetuate it
here. If you have, the recipe below should serve to refute it. Copy it, print it out, pass it along to friends and family. It's a terrific recipe. And it's absolutely free."


Well, with Neiman-Marcus providing a true N.M. recipe and with the endurance of the urban legend I thought it would be a fun idea to bake the two cookies and put them to the test. Which cookie was better? The real Neiman-Marcus cookie or the urban legend Neiman Marcus cookie.

Both recipes were fairly simple (I provide each one at the end of this post) and I was able to make both the same night. It should be noted that the urban legend recipe contains a lot more ingredients and is more of an oatmeal/chocolate chip cookie than the real N.M. recipe which is a twist on the classic c.c. cookie. These differences make it a bit harder to compare but we were up for the challenge.

The Urban Legend cookie's (ULC) dough was much more interesting than the Real Neiman-Marcus Cookie (RNMC) and in my opinion tasted better. The texture was great and the dough very thick (don't attempt to make the ULC with a hand mixer!). However, the RNMC had the most wonderful smell while cooking. It was similar to a chocolate chip cookie smell but more intense and just awesome. The appearance of the two after they were done baking was totally different. The ULC was more of a home-made rustic look while the RNMC were more sleek and traditional looking (but still a darker color than a traditional c.c. cookie). It's hard to judge which one looked better but they both looked delicious and I think it depends on type of look your going for.

As for the taste (which is what we utimately judged the cookie on), we brought the cookies to about a dozen people without telling them which cookie was which. What were the results? Split 50/50. Some people loved the oatmeal and nuts in the ULC while others felt that those ingredients didn't belong in a real chocolate chip cookie. The people who liked the NMC best all said it was more buttery and if they went and bought a cookie at N-M then this the NMC is what they would expect to get. Overall, everyone really loved both cookies but most people agreed that the real Neiman-Marcus cookie belonged at the store.

Recipes:


Urban Legend Cookie Recipe:


Ingredients


1 cup butter
2 cups flour
1 tsp. baking soda
1 cup sugar
2 1/2 cups blended oatmeal (measure oatmeal and blend in a blender to a fine powder)
12 oz. chocolate chips
1 cup light brown sugar
1/2 tsp salt
1/2 of an 8oz. Hershey Bar (grated)
2 eggs
1 tsp. baking powder
1 1/2 cups chopped nuts (your choice but I used walnuts)
1 tsp. vanilla


Directions

Cream the butter and both sugars. Add eggs and vanilla; mix together with flour, oatmeal, salt, baking powder, and baking soda. Add chocolate chips, Hershey Bar and nuts. Roll into balls and place two inches apart on a cookie sheet. Bake for 10 minutes at 375 degrees. Makes 66 cookies.


The Real Neiman-Marcus Chocolate Chip Cookie Recipe:


Ingredients
1/2 cup (1 stick) butter, softened
1 cup light brown sugar
3 tablespoons granulated sugar
1 large egg
2 teaspoons vanilla extract
1-3/4 cups all purpose flour
1/2 teaspoon baking powder
1/2 teaspoon baking soda
1/2 teaspoon salt
1-1/2 teaspoons instant espresso coffee powder
1-1/2 cups semi-sweet chocolate chips


Directions
1. Preheat oven to 300 degrees. Cream the butter with the sugars using an electric mixer on medium speed until fluffy (approximately 30 seconds)

2. Beat in the egg and the vanilla extract for another 30 seconds.

3. In a mixing bowl, sift together the dry ingredients and beat into the butter mixture at low speed for about 15 seconds. Stir in the espresso coffee powder and chocolate chips.

4. Using a 1 ounce scoop or a 2 tablespoon measure, drop cookie dough onto a greased cookie sheet about 3 inches apart. Gently press down on the dough with the back of a spoon to spread out into a 2 inch circle. Bake for about 20 minutes or until nicely browned around the edges. Bake a little longer for a crispier cookie.

Yield: 2 dozen cookies